Showing posts with label Recipere. Show all posts

Wednesday, May 20, 2015

Russian Cabbage Salad


Tom had this at a Russian Cafe in one of Seattle's International Food Courts. I loved it! Which means I kept stealing it off his plate. I vowed to him that I would have to learn how to make that for us and this is the recipe I've conjured up so far that is the closest I can get to the goodness we had for way too much money. If I find something to make it even better, a tweak or a slight change, I'll re post it for all.

INGREDIENTS:
1 head cabbage, cored and shredded or 1 bag of ready chopped cole slaw mix
1/8 cup olive oil or canola oil (I use 1/2 of each)
1 teaspoon granulated garlic
Juice of 1/2 of a lemon's freshly squeezed.
Juice of two limes freshly squeezed.
Chopped fresh cilantro (I use most of a whole bunch. Less could be used.)
Salt and Pepper to taste

DIRECTIONS:
Place the shredded cabbage in a large bowl, and drizzle olive oil over it. Toss until evenly coated. Season with garlic, lemon juice lime juice, cilantro, salt and pepper. Stir to blend in all of the flavors. Store in the fridge for a few hours before serving for a more tastier salad.

Per Serving: 129 calories, 9.1 grams of fat, 1.5 grams of saturated fat, 14.8 grams of carbs, and 1.9 grams of protein. Makes 8 Servings.

Monday, December 1, 2014

Turnip, Apple and Carrot In The Raw Slaw

In the Raw Slaw with Turnip, Apple and Carrot. One of our absolute favorites.


1 Clove Garlic, minced
2 Large Turnips; cleaned, peeled and shredded
1 Large Crisp Apple; cleaned and shredded

3 Large Carrots; cleaned and shredded
1/2 cup of Maple Grove Farms Citrus Vinaigrette Dressing 
Fresh cilantro, finely chopped, for garnish
Black sesame seeds, for garnish

Mix all the shredded turnips, apple and carrots together! Next, toss in the garlic, pour the dressing over the shredded mix and combine evenly.   Taste... add more dressing if you like.  Top with sesame  seeds and cilantro. We do not use salt, but you could season if needed.

Serve.

Monday, October 7, 2013

Spicy Kale & Green Chili Posole Soup

This came from the 'The World's Healthiest Foods, Essential Guide to the Healthiest Way of Eating' by George Mateljan. It is a quick and easy Mexican flavored soup is very refreshing and spicy. The degree of spiciness will depend on the type of chilis that you use. The kale adds extra taste and an additional boost of nutrition. Make sure you chop the kale fine for this soup. The finer it's chopped the more it will blend with the other flavors and the easier it will be to eat with a spoon. This soup is better after it sits for awhile, allowing the flavors to infuse. There is nothing to adapt in this recipe. It is already very healthy and tastes super yummy!


Ingredients:
* 1 medium onion, chopped
* 6 medium cloves garlic, chopped
* 4 cups + 1 TBS chicken or vegetable broth
* 2 TBS fresh lime juice
* 3 cups kale rinsed and chopped fine (remove stems)
* 2 cups hominy
* 15 oz can diced tomatoes
* 4 oz can diced green chili
* 3 TBS chopped fresh cilantro
* Salt and pepper to taste

Directions:

1. Chop onion and garlic and let sit for 5 minutes before cooking to bring out their hidden health benefits.
2. Rinse kale and remove stems. Chop fine.
3. Heat 1 TBS broth in medium sized soup pot. Healthy Sauté onion in broth over medium heat for 5 minutes stirring frequently, until translucent.
4. Add garlic and continue to sauté for another minute.
5. Add remaining ingredients except cilantro. Bring to a boil on high heat. Once it comes to a boil, reduce heat to medium low and simmer for 15 minutes, uncovered.
6. Add cilantro, salt and pepper.
     Calories            135.27
     calories from fat    11.20
     calories from saturated fat  1.52
     protein              4.93 g
     carbohydrates        27.03 g
     dietary fiber        6.02 g
     sugar - total        6.43 g
     fat - total          1.24 g
     saturated fat        0.17 g
     mono fat             0.24 g
     poly fat             0.57 g
     cholesterol          0.00 mg

Quinoa-Corn Bread


The posted recipe was adapted from the following link to be healthier for me and my family. Some of you may enjoy the original. We were not fond of the cream custard nor of the original fat ratio.


 Ingredients:
1 cup whole wheat flour
3/4 cup yellow cornmeal (coarse)
1 teaspoon baking powder
1/2 teaspoon baking soda
1/2 teaspoon sea salt
2 large eggs
1 1/2 cups cooked quinoa, room temperature
3 tablespoons unsalted butter, barely melted and cooled a bit
3 tablespoons raw sugar (or brown sugar)
2 cups Unsweetened Almond Milk
1 1/2 tablespoons Red Cider Vinegar

Preheat the oven to 350F. Spritz a 9x7x2 pan or 10in oven-proof skillet with your oil of choice. Roughly ten minutes before you are ready to bake the cornbread, while you are mixing the batter, place the pan in the hot oven.

In a large bowl stir together the flour, cornmeal, baking powder, baking soda, and if you wish, add 1 teaspoon dried mixed herbs (optional). For example, on Black Bean Chili night, I added a Mexican Seasoning Herb Mix.

In a separate bowl, beat the eggs, quinoa, and melted butter until well-blended. Add the sugar, salt, milk and vinegar and stir again. Then add the wet ingredients to the dry ingredients and stir just until the batter comes together. It will seem very thin, don't worry.

Pour the batter into the heated skillet. Carefully place in the oven and bake for 40 to 50 minutes, the bread is done when the top becomes lightly browned and the center just set.

Makes 12 servings

Thursday, September 5, 2013

Vanilla Bean Peach Syrup


Ingredients:

  • 5 cups pureed organic peaches (peel, remove pits and toss the rest in the vita-mix or food processor) 
  • 2 cups sugar 
  • 2 tbsps fresh squeezed lemon juice 
  • 2 tsps homemade vanilla bean extract
Directions:

  1. Combine peach puree, sugar and lemon juice in kettle. 
  2. Bring to a boil and simmer 5 minutes.
  3. Add vanilla. 
  4. Pour into sterilized hot jars and seal.
  5. Process in boiling water bath for 20 minutes.
It made 4 - 12 ounce jars.

Friday, August 9, 2013

Four Thieves All Natural Bug Spray


Ingredients:


Directions: 
  • Combine the recommended measured amounts of herbs and vinegar in a glass canning jar, seal with lid and steep in a cool, dark place for 3 weeks or more, shaking daily. Then, strain out the used herbs, and retain the herbal liquid mixture.
  • The Vinegar of the Four Thieves is a super-strong insect repellent. It should be diluted with water to half strength if you spray it directly on your skin. 


Things to Note:

  • DO NOT use on broken skin.
  • The Vinegar of the Four Thieves can be used to benefit anyone: men, women, children and animals.
  • This repellent can be used many ways. Splashed on your socks or shoes will discourage ticks, chiggers, and mites. An herbal cloth kept in your pocket and rubbed on your skin ever hour or so would be very beneficial during outdoor work or recreation. Or, a nightly bath with a little herbal vinegar and oil will keep it on your skin for many hours and could prove helpful for families who live in the country or while out on camping trips.
  • It can be used as often as you would like, and in any external application you choose.
  • Storage is not a critical issue with this mixture. However, we keep ours in a dark, dry and cool place.

Thursday, May 30, 2013

Waste Not Want Not Veggie Broth

This is my Butts, Stalks and Pieces Veggie Broth. After reading an article about how American's waste 165 BILLION dollars worth of food A YEAR! I made it my mission to cut down our families food waste. And this recipe is one of the ways I've done it, while saving us tons of money on expensive salt free broths.

How do I do that? Well, I don't toss those trimmed ends from onions, carrots, celery, parsnips, cabbage cores, kale steams, bruised peas, peppers etc. Store them in plastic container in my freezer, and once you have enough saved up, add them to a large pot water, boil it with my favorite salt free herbs/spice and make homemade vegetable broth.

It's awesome!

Monday, May 6, 2013

Hot Quinoa Cereal with Maple Syrup Apples

Ingredients

 
1 cup diced Fuji apple
1/4 cup water
1/2 tsp Pumpkin Pie Spice
2 cups water

2/3 cup quinoa flakes
1 tbsp raw sugar
3 tbsp pure maple syrup
1 tsp pure vanilla extract
1 tbsp prepared whole quinoa


 Preparation

1. Combine apple and 1/4 cup water in a small skillet; bring to a boil. Stir in pumpkin pie spice; cover, reduce heat, and simmer just until crisp-tender. Remove from heat; uncover and let stand.

2. Bring 2 cups water to a boil in a large saucepan over high heat; stir in quinoa flakes. Cook 1 1/2 minutes, stirring frequently. Remove from heat; stir in sugar, and let stand 5 minutes or until slightly thickened.

3. While cereal stands, return apple mixture to medium heat; add syrup, and vanilla, stirring just until warmed. Serve apple mixture over cereal topped with a sprinkle of whole quinoa.

Makes 4 small servings or 2 decent sized ones.


Nutritional Value @ 2 Servings:

Calories 144
Total Fat 1.1 g 2%
Saturated Fat 0 g 0%

Trans Fat 0 g
Cholesterol 0 mg 0%
Sodium 3 mg 0%
Total Carbs 32 g
Dietary Fiber 2 g 8%
Sugars 20 g
Protein 2 g
Vitamin A 0 µg 0%
Vitamin C 2 mg 2%
Calcium 21 mg 2%
Iron 0.9 mg 5%

Friday, April 19, 2013

Whole Wheat Sandwich Bread - Specimen 1

I have been on a quest for some time now, a quest to find a way to make homemade wheat sandwich bread that can stand up to the sandwich bread my kids were used to me buying from the store.  In my search, I discovered that almost every 'mom' blog out there with bread makers had been on the same quest at one point or another. And almost everyone has claimed to have found the perfect recipe.... yet each one has a totally different recipe then the other.

And so, begins my own personal search to create a recipe that my family & I will think is the best sandwich bread we've ever had while keeping  to an easier bread machine process.

I present to you, Specimen 1. It's a whole wheat bread without much dressing added to it. Just plan and simple.

 https://sphotos-b.xx.fbcdn.net/hphotos-prn1/903268_10151419655388697_1152989539_o.jpg

Ingredients:
1 1/3 c. water
1 tspn. salt
1 tblspn. coconut oil
3 tblspn. honey
1 tblspn. apple cider vinegar
2 c. whole wheat flour
1 c. unbleached all-purpose flour
2 1/2 tspn active dry yeast

I put all this in order in my bread machine, hit the dough cycle and let it do all the work. Once done, I shaped it into my 1 lb loaf pan, baked it for 25 minutes at 350 degrees.

I thought it was strange that it called for apple cider vinegar. But  you honestly cant taste it. I replaced the olive oil with coconut oil. And lowered the salt content. It cuts easily enough right out of the oven, though it seem a little gummy while it was still hot.

Once cooled, the bread was a little soft. I sliced it and loaded it with sandwich makings.. it held up pretty good and it tastes great too. Gotta get the kids to test it. I want to wrestle with a whole grain bread option too.


Thursday, February 7, 2013

Apricot Curry Chicken

I've been making this dish for my family for some time now and have adapted it into something simple and healthy. They love the sweet and spicy taste of it as well as the different textures. It's an easy warm hearty dish.

1 chopped sweet onion, chopped
1-3 tablespoons curry powder (How spicy do you like it?)
2 tablespoons canola oil
3-4 skinless, boneless chicken breasts, cut into bite-sized chunks
1/2 cup apricot preserves (I've used sugar free and regular)
2 medium apples, cored and diced (I use Granny Smith, Galas or Fuji)
1 cup vanilla fat-free yogurt

An a large nonstick skillet cook onion and curry in oil until slight tender, 1-2 minutes. Push onion mixture to side of skillet. Cook chicken in skillet over medium heat for 3 to 5 minutes or until no longer pink. Stir together chicken and onion mixture. Stir preserves and apples, cook for 5 minutes. Stir yogurt chicken mixture. Cook and stir for 2 minutes more. May be served over rice or eaten on it's own. We usually use Jasmine rice for this dish.

6 Serving

     Adapted                         Unadapted                
     Calories 208          Calories 419
     Total Fat 6.1          Total Fat 6.1
     Sat Fat   0.7 g          Sat Fat   1.5 g
     Cholesterol 45 mg          Cholesterol 50 mg
     Sodium 76 mg          Sodium 97 mg
     Total Carbs 20 g          Total Carbs 67 g
     Fiber 3.6 g          Fiber 3 g
     Sugar 5.6 g          Sugars 40.8 g
     Protein 20 g          Protien 20 g

Saturday, November 17, 2012

Apricot Cranberry Sauce

I make this 'every' year for Thanksgiving and Christmas. It's a simple version of Cranberry sauce that everyone in the family loves! I haven't even dared tried to Adapt it... It's just too perfect as it is...

1 12-oz. pkg. fresh cranberries, chopped ( I use a a food processor)
1/2 cup sugar
1/2 cup apricot preserves
1/3 cup water

Combine all of the ingredients in a medium-size saucepan. Bring to a boil, reduce to low, and simmer until the cranberries are tender and the sauce begins to thicken. It will continue to thicken as it cools. I have also used an immersion blender to make it a little less chunky for family members who like a smoother texture to their sauce. Makes 12 one ounce servings.

Friday, August 31, 2012

Spicy Sweet Potato Hummus


Adapted from 'My New Roots' and 'Whole Family Fare'
Yields 3-4 cups of hummus (a lot!)

Ingredients:
• 2 medium sweet potatoes
• 3 tablespoons olive oil
• 2 cups chickpeas
• 3 tablespoons tahini
• 3 cloves garlic, peeled
• juice of 1 lemon
• zest of 1/2 lemon
• 1 1/2 teaspoon cayenne pepper
• 1/2 teaspoon smoked paprika
• 1/4 teaspoon cumin

Directions:
1. Preheat oven to 400 degrees Fahrenheit. Bake the sweet potatoes on the middle oven rack or in a baking dish for 45 minutes to an hour. They should yield to a gentle squeeze when they’re done baking.
2. While the sweet potatoes are cooling, toss all of the other ingredients into a food processor. Once the sweet potatoes have cooled enough to handle, use a knife or your fingers to peel the skin off of them. Add the sweet potatoes to the food processor.
3. Blend well, and serve! I garnished mine with a light sprinkle of cayenne pepper and sesame seeds.


*Salt-Free - I do not use salt in my of my cooking. For those whom like things a little more on the salty side the recipes I adapted this from used 'Salt to Taste' measurements.

Tuesday, August 21, 2012

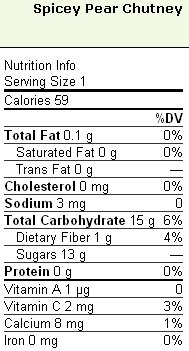
Spicy Pear Ginger Chutney


A dear friend of mine brought this over for a dinner gathering we had, serving it over cream cheese with crackers. It was AMAZING! I finally got the recipe from her and am cooking up my own batch to can today! My house at least smells like FALL even though it's 98 outside still!

Ingredients:

3 pounds (about 6 cups) hard, under-ripe pears, cored, seeded, and chopped. I did not peel them.
3 cups light or dark brown sugar
3 cups apple cider vinegar
1 tablespoon mustard seeds
2 teaspoons cayenne pepper
1/4 pound crystallized ginger, chopped (about 2/3 cup)
1 teaspoon ground cinnamon
1/2 teaspoon Quatre-Epices (Recipe below)
1 cup dark raisins
1 cup light raisins
2 cups chopped onion
1 lemon, peeled and thinly sliced

Directions:
Cook the pears in water to cover until they are medium-soft. Drain, saving the water, then make a syrup of the water in which the pears were cooked and the brown sugar by boiling in a large nonreactive pot until thick, about 20 to 30 minutes. While the syrup is boiling, add the remaining ingredients to the pears, then mix everything together and cook for about 30 minutes or until the raisins are softened, the onions are transparent, and the chutney has a good thick consistency. Transfer to sterilized jars and seal; process in a boiling water bath for 10 minutes.

QUATRE-EPICES - "Four-spices" usually include four of five spices. I used all five. Vary the amounts to suit your own palate. 2 tablespoons (1/8 cup) ground white peppercorns 1/2 teaspoon freshly grated nutmeg 1/2 teaspoon ground cloves, 1/4 teaspoon ground cinnamon, and 1/4 teaspoon ground ginger. Store in a cool, and dry place.

Makes 5-6 pints.


Sunday, August 5, 2012

Harvesting & Freezing Fresh Basil


The best time to harvest basil is right before it flowers and as late in the day as you can to cause less stress on the plants.  The best way to harvest it, is by cutting the plant down to about half or even two thirds of it's size. Always cut each stem just above a healthy leaf cluster. This gives you a great amount of the herb to harvest and it allows the plant continue to grow for future harvesting.
 
With the help of blogs A Pinch Of... and Kalyn's Kitchen I got a little refresher course on how to freeze Basil today and managed to process and store all my basil trimmings for later use.


The whole process is simple really.  You trim your basil's tops off, cutting to allow for new growth.  The stems are discarded before you rise off your leaves. Once rinsed, dry gently by blotting with towels. After that, move them over to the food processor, lightly filled and pulsate while adding just a light stream of oil, about 2-3 tablespoons. The oil makes for a smooth, manageable mixture, and also helps prevent the leaves from blackening. Once chopped to the degree you desire... I prefer coarsely, then put into your freezing container... an ice cube tray and a few small yogurt tubs, or similar-sized small freezer containers...  portion it out in sizes that fit your needs Today, I couldn't find my little ice cub tray I use for herbs so I ended up using a styrofoam egg carton we recycled. This worked out great. Once frozen sold, I popped them out and transferred them to a freezer bag.

Monday, August 15, 2011

Our Family Recipes

No matter what house we are in, the Kitchen and what is created in it is one of the backbones of our home and family. Over the years we have created not only food.... but many memories and experiences together. At first it was cooking what we knew... as cheaply as we could. But as the years past, it became more. We choose to take responsibility for our happiness and in that choice, we learned to value our health and what we put into our bodies. Regretfully, we can't go back and undo our mistakes, but we can move forward, ever learning and improving upon what we do today and any tomorrows we are blessed with.

For us, we have given up the cheap chemically processed foods that places like Wal-Mart make so easily and readily available. We do this by going as local as we can with as much in-season and minimally processed foods as we can. The finest quality of fresh, flavorsome and healthy meals created by hand-picked ingredients. The ones I am learning to store in my cupboard, and can rely upon to create with love any number of different dishes. We try at least one new creation a week, discovering new loves and even a few that we will never make again. We are currently working on going non-GMO and adding many RAW experiments into our weekly menus, learning what we do and do not like. Additionally, these choices fit well with our main family goal of living self-sufficiently.